
Timber flooring has long been celebrated for its natural beauty, durability, and timeless charm. But when it comes to installing timber over concrete slabs or other solid subfloors, one of the most trusted and effective methods is Direct Stick Timber Flooring, also known as Glue Down Timber Flooring.
In this comprehensive guide, we’ll take you through everything you need to know about the direct stick method—from what it is, when to use it, its pros and cons, installation process, ideal timber types, and how it performs in Melbourne homes. Whether you’re a homeowner planning a renovation or a builder researching best practices, this article is packed with expert insight and actionable advice.
Read more: Can You Lay Timber Flooring Over Tiles? (Yes, and Here’s the Full Guide)
What is Direct Stick Timber Flooring?

Direct stick timber flooring is an installation technique where timber planks—either engineered or solid hardwood—are glued directly to the concrete slab or another suitable subfloor using a high-performance flooring adhesive. This glue down method offers a sturdy, permanent floor that feels solid underfoot and enhances acoustic performance.
Unlike floating floors that sit on an underlay or nail-down floors that require timber substructures, the direct stick method bonds each plank firmly to the substrate, creating a seamless and stable walking surface.
Key Features of Glue Down Timber Flooring
Permanent installation: Each plank is affixed directly to the subfloor with adhesive.
Ideal for concrete slabs: Especially suitable for homes with slab foundations, such as modern Melbourne builds.
Acoustically superior: Reduced footfall sound compared to floating floors.
Low movement: Minimises floor shifting, creaking, or bouncing over time.
Refinishing options: Can be sanded and refinished depending on the timber thickness.
Benefits of Direct Stick Timber Flooring
1. Solid Underfoot Feel
A direct stick timber floor feels robust and grounded—closer to traditional hardwood than a floating floor. This is especially appealing for homeowners looking for a high-end finish in living areas, hallways, or kitchens.
2. Excellent Acoustic Performance
Because the floor is bonded to the slab, there’s minimal movement or echo. This method is often chosen for apartments, multi-storey dwellings, or any property where sound control is a priority.
3. Long-Term Stability
The glue down method provides better stability in areas with fluctuations in humidity or temperature—common in Melbourne’s climate. Boards are less likely to expand, contract, or lift over time if installed correctly.
4. Greater Timber Variety
Engineered timber and solid timber can both be installed using the direct stick method. This gives homeowners more flexibility in choosing premium timber species and finishes.
When Is Direct Stick Flooring the Best Choice?

Direct stick timber flooring is especially effective in the following scenarios:
Over Concrete Slabs: This method excels when installing over concrete subfloors, which are typical in many modern Melbourne homes and apartments.
Low-Height Thresholds: Where floor height is limited, glue down floors don’t require underlay, making them ideal for smooth transitions between rooms.
High Foot Traffic Areas: Kitchens, hallways, and commercial spaces benefit from the solid feel and durability.
Underfloor Heating Compatibility: Certain adhesives and engineered timber options make glue down flooring compatible with radiant heating systems.
Types of Timber Suitable for Glue Down Installation
Engineered Timber Flooring

Engineered timber is the most common choice for direct stick installation. Its multi-layered construction reduces the risk of warping and makes it highly stable, even in fluctuating climates.
Available in a wide range of finishes
More dimensionally stable than solid timber
Often pre-finished for quicker installation
Solid Hardwood Timber Flooring
Solid timber is heavier and more reactive to moisture but delivers unmatched natural beauty. It requires a completely level and dry subfloor and is best installed by experienced professionals.
Offers longevity and can be sanded multiple times
Requires acclimatisation before installation
Typically thicker (18–20mm)
Subfloor Preparation: The Key to Success
Whether you’re installing over a concrete slab, tiles, or screed, subfloor preparation is vital for a successful direct stick timber flooring job.
Moisture Testing
Concrete must be fully cured and dry. High moisture content can cause adhesive failure and timber warping. A moisture barrier may be required in some Melbourne homes.
Surface Leveling
Subfloors must be flat to within ±3mm over 3 metres. Grinding or using self-levelling compounds is often necessary before applying adhesive.
Cleaning & Priming
Dust, grease, and debris must be completely removed. Most adhesive manufacturers recommend using a primer for better bonding.
Step-by-Step Glue Down Installation Process

Here’s a simplified outline of the direct stick timber flooring installation method:
Step 1: Acclimatise the Timber
Allow the timber to adjust to the room’s temperature and humidity for at least 48 hours before installation. This reduces the risk of future expansion or contraction.
Step 2: Prepare the Subfloor
Conduct moisture tests
Clean and level the surface
Apply a primer or moisture barrier if required
Step 3: Plan Your Layout
Mark the starting point (typically the longest wall)
Consider timber grain direction and light source
Leave a 10–15mm expansion gap around the perimeter
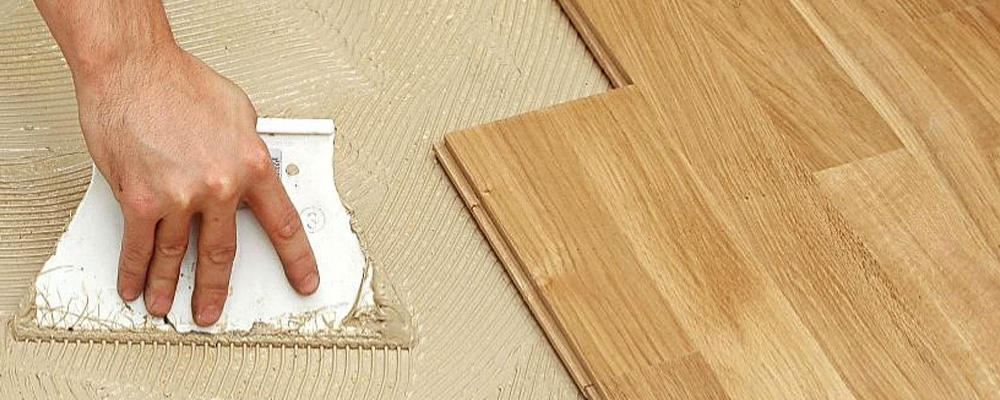
Step 4: Apply the Adhesive
Use a notched trowel to spread adhesive evenly over a manageable area (usually 1–2 square metres at a time). Don’t let it skin over.
Step 5: Lay the Timber Boards
Press boards firmly into the adhesive, using a rubber mallet if needed. Use spacers to maintain the expansion gap and check alignment regularly.
Step 6: Rolling
Use a flooring roller to ensure even pressure and full contact with the adhesive.
Step 7: Curing
Allow the adhesive to cure fully—usually 24 to 48 hours—before walking on the floor or placing furniture.
Common Mistakes to Avoid
Skipping moisture testing: This can result in major failures later on.
Using the wrong adhesive: Always use adhesives recommended for your timber type and subfloor.
Rushing layout planning: A poorly planned layout can lead to awkward board cuts or visible joints.
Not leaving expansion gaps: Timber needs space to expand—don’t install boards tightly against the wall.
Maintenance Tips for Direct Stick Timber Floors

Once installed, proper care ensures your floors remain beautiful and functional for years.
Use felt pads under furniture to avoid scratching.
Clean spills immediately to avoid moisture absorption.
Sweep and vacuum regularly to remove dirt and grit.
Avoid harsh cleaners—use products designed for timber flooring.
Re-coat or refinish periodically based on timber wear and foot traffic.
Is Direct Stick Flooring a DIY Job?
While floating floors are suitable for most DIYers, glue down timber flooring is a more technical process. Adhesive timing, subfloor prep, and precision are critical for long-term performance. For this reason, we recommend hiring experienced flooring professionals—especially for solid timber or large-scale engineered installations in Melbourne homes.
Cost of Glue Down Timber Flooring in Melbourne
The cost of direct stick timber flooring varies depending on:
Timber species and grade (e.g., Blackbutt, Spotted Gum, Oak)
Subfloor condition and preparation required
Labor and adhesive type
As of 2025, average installation costs range from $85 to $140 per square metre, including materials and labor. This makes it a mid-to-premium flooring option, delivering long-term value through durability and performance.
Why Melbourne Homeowners Prefer Direct Stick Timber Flooring
Melbourne’s diverse architecture, ranging from Victorian terraces to modern apartments, makes direct stick flooring a versatile choice. It’s compatible with concrete slabs common in new builds and provides excellent thermal and acoustic insulation for city living. Additionally, Melbourne’s fluctuating weather conditions demand a stable installation method—and glue down timber flooring delivers.
Conclusion
Direct Stick Timber Flooring is one of the most robust, long-lasting, and aesthetically pleasing methods for installing timber over a concrete slab or stable subfloor. Whether you’re considering engineered or solid timber, this glue down technique offers unmatched stability, excellent acoustic performance, and a premium look and feel.
If you’re renovating or building in Melbourne, and want timber floors that will stand the test of time, direct stick installation is a smart investment. However, due to its technical nature, it’s essential to ensure correct subfloor preparation and consider hiring professionals for the best results.
Need Help with Timber Flooring in Melbourne?
At CB Timber Floors, we offer expert installation of direct stick timber flooring tailored to Melbourne homes. With over 20 years of experience and a commitment to quality craftsmanship, we ensure every project meets the highest standards—from subfloor preparation to final polishing.
Visit cbtimberfloors.com.au to learn more or request a free on-site quote today.
Frequently Asked Questions (FAQs)
1. What is the difference between direct stick and floating timber flooring?
Direct stick flooring involves gluing timber planks directly to the subfloor, offering a solid feel and better acoustic performance. Floating floors, on the other hand, are installed over an underlay without being attached to the subfloor, making them easier for DIY but sometimes less stable and noisier underfoot.
2. Can I install direct stick timber flooring over an old tile floor?
Yes, but only if the existing tiles are clean, level, stable, and well-bonded. You may need to lightly grind the tile surface or apply a suitable primer to help the adhesive bond effectively. In some cases, removing the tiles and leveling the subfloor is a better long-term solution.
3. How long does glue down timber flooring take to install and cure?
The installation process typically takes 1–3 days depending on the area size and subfloor condition. However, it’s important to allow 24–48 hours for the adhesive to cure before placing furniture or walking on the floor. Always follow the adhesive manufacturer’s instructions for curing times.
4. Is glue down timber flooring suitable for homes with underfloor heating?
Yes—engineered timber flooring installed with the correct adhesive is generally suitable for underfloor heating systems. It’s important to ensure that the flooring product and glue are rated for use with radiant heating, and that temperature increases are gradual to avoid stressing the timber.
5. How do I maintain direct stick timber flooring?
Keep your floors in top condition by sweeping regularly, using timber-specific cleaners, and avoiding excess moisture. Place felt pads under furniture, clean spills promptly, and recoat or refinish the surface as needed. Avoid steam mops and harsh chemicals that can damage the timber or finish.


