
Introduction: Why Tongue and Groove Flooring Is a Game-Changer
Tongue and groove flooring is a type of wood flooring where each plank has a tongue (ridge) on one side and a groove (slot) on the other, allowing the boards to lock together for a smooth, gap-free finish. This interlocking design makes installation easier, improves stability, and works with both solid hardwood and engineered flooring.
Whether you’re a DIY enthusiast or a homeowner wanting to save on professional costs, learning how to install tongue and groove flooring step-by-step can help you achieve a high-quality floor at a fraction of the price. In this guide, you’ll learn everything from prepping your space and choosing tools to laying your final board and adding finishing touches.
1. Understanding Tongue and Groove Flooring
1.1 What Is Tongue and Groove Flooring?

Tongue and groove flooring features boards with a tongue (a thin ridge) on one side and a groove (a slot) on the other. When installed, the tongue fits snugly into the groove of the adjacent board, locking them together. This system:
Reduces gaps between boards
Increases floor stability
Works for both nailed-down, glued-down, and floating installations
1.2 Why Choose Tongue and Groove Flooring?
You should choose tongue and groove flooring because it gives you a seamless, durable, and stable finish that’s easy to install and works with a wide range of materials like solid hardwood, engineered wood, and bamboo.
The interlocking tongue-and-groove design means:
No visible gaps – boards fit tightly for a clean look
Better stability – reduces movement and creaks over time
Versatility – suitable for different rooms and subfloor types
DIY-friendliness – easier to align than traditional square-edged boards
It’s a smart option whether you want a premium professional fit or a cost-saving DIY project.
2. How Do You Plan a Tongue and Groove Flooring Installation?

Solid timber flooring planks
Planning starts with measuring your room accurately, choosing the right material, and letting it acclimate to the space before installation.
Before you touch a single board, planning is crucial.
2.1 Measure Your Space Accurately
Use a steel measuring tape to measure the length and width of your room, then multiply to get the square footage. Always add 10% extra to account for offcuts and mistakes.
Pro Tip: If your room is irregularly shaped, break it into smaller rectangles, calculate each area, then add them together.
2.2 Choose the Right Material
Your choice of tongue and groove flooring will depend on:
Room use – Solid hardwood for living areas, engineered wood for kitchens or basements
Traffic level – Harder woods like oak or maple for busy spaces
Style preference – Matte, glossy, hand-scraped, or wire-brushed finishes
2.3 Acclimate the Flooring
Leave your flooring in the room for 48–72 hours before installation. Wood expands and contracts with humidity — acclimating helps prevent post-install warping.
3. Tools and Materials You’ll Need
Having everything ready will save you frustration later.
Essential Tools:
Tape measure
Chalk line
Carpenter’s square
Pry bar
Rubber mallet
Flooring nailer or stapler (for nail-down)
Circular saw or miter saw
Safety goggles and ear protection
Materials:
Tongue and groove flooring planks
Underlayment (if floating)
Adhesive (if glue-down)
Nails or staples (if nail-down)
Floor spacers
Wood filler (optional)
4. Preparing the Subfloor for Tongue and Groove Flooring

4.1 Clean and Inspect
A clean, level subfloor is non-negotiable. Sweep, vacuum, and inspect for nails, staples, or debris.
4.2 Level the Surface
Any dips or bumps over 3mm need fixing. Use a leveling compound for concrete or a sander for wooden subfloors.
4.3 Install Underlayment (If Needed)
For floating floors, roll out underlayment to improve cushioning, reduce noise, and create a moisture barrier.
5. How Do You Install Tongue and Groove Flooring Step-by-Step?
To install tongue and groove flooring, you’ll start by prepping the room, planning your layout, and then laying boards row-by-row while maintaining the correct expansion gap and staggering joints for strength. Here’s a detailed, foolproof breakdown:
Step 1: Prepare the Room
Remove all furniture, rugs, and baseboards/skirting.
Check that the subfloor is clean, dry, and level (within 3mm over 2m).
For concrete subfloors, add a moisture barrier. For floating installations, roll out underlayment.
Pro Tip: If you’re working in a humid climate, run a dehumidifier for a day before installation to stabilize moisture levels.
Step 2: Plan Your Layout

Decide on plank direction. Most pros lay them parallel to the longest wall or toward the main natural light source.
Measure the room and calculate how many rows you’ll need.
If the last row would be less than 50mm wide, trim the first row slightly so both the first and last rows are wider for balance.
Troubleshooting Tip: Uneven walls? Measure at both ends of the room — adjust your starting row so the gaps on each side look even.
Step 3: Create a Starting Line
Snap a chalk line about 10–12mm from the wall.
This expansion gap allows wood to expand and contract without buckling.
Use floor spacers along all walls to maintain the gap during installation.
Step 4: Lay the First Row

Place the groove side toward the wall.
If needed, trim off the tongue on the first row for a cleaner expansion gap.
Ensure the row is perfectly straight — this row sets the alignment for the entire floor.
Pro Tip: Use a long spirit level to check straightness before committing.
Step 5: Connect the Second Row
Cut the first board of the second row so the joints are staggered at least 150mm from the first row.
Insert the tongue of the new board into the groove of the first row at about a 20–30° angle, then press down until it clicks into place.
Use a tapping block and rubber mallet to gently secure boards without damaging the tongue.
Step 6: Continue Row-by-Row
Keep staggering joints for stability and visual appeal.
Check alignment every 3–4 rows — small errors can compound and cause gaps later.
For floating floors, lock the short ends first, then join the long edges.
Troubleshooting Tip: If a board won’t lock, check for debris in the groove or a damaged tongue. Replace or clean before forcing it in.
Step 7: Fitting Around Obstacles

For doorways, cut the bottom of the door jamb with a handsaw so boards can slide underneath for a seamless look.
Use a jigsaw for irregular cuts around pipes or vents, remembering to leave expansion gaps and cover them with trim.
Step 8: Install the Last Row
Measure the gap for the final row, subtract the expansion gap, and cut the boards to width.
Use a pull bar to fit boards tightly where a tapping block won’t fit.
Step 9: Remove Spacers and Add Finishing Touches
Take out all spacers around the perimeter.
Install baseboards or quarter-round trim to cover the expansion gap without pinning the floor down.
Clean the surface to remove any dust or debris from the installation process.
Step 10: Post-Installation Care
For glue-down floors, avoid walking on them for 24 hours.
For floating or nail-down floors, light traffic is fine immediately.
Place felt pads on furniture legs and use rugs in high-traffic areas to protect your new floor.
Quick Reference Table:
| Step | Task | Key Tip |
|---|---|---|
| 1 | Prepare the room | Remove baseboards, level subfloor |
| 2 | Plan layout | Avoid very narrow last rows |
| 3 | Create starting line | Maintain 10–12mm expansion gap |
| 4 | Lay first row | Groove side faces wall |
| 5 | Install second row | Stagger joints ≥150mm |
| 6 | Continue rows | Check alignment every few rows |
| 7 | Fit around obstacles | Undercut door jambs |
| 8 | Install last row | Use pull bar for tight fit |
| 9 | Remove spacers & finish | Install trim without restricting floor |
| 10 | Care | Limit traffic for glue-down for 24 hrs |
What are The Differences Between Nail-down, Glue-down, and Floating Tongue and Groove flooring?
The difference lies in how the boards are fixed to the subfloor: nail-down uses fasteners, glue-down uses adhesive, and floating locks boards together without fastening to the subfloor.
1. Nail-Down Installation

How it works: Boards are secured to a wooden subfloor using nails or staples through the tongue.
Best for: Solid hardwood or thicker engineered wood over plywood or OSB.
Pros:
Extremely stable and long-lasting
Professional, solid feel underfoot
Cons:
Requires a flooring nailer/stapler
Not suitable for concrete subfloors
Harder to remove or replace boards later
2. Glue-Down Installation
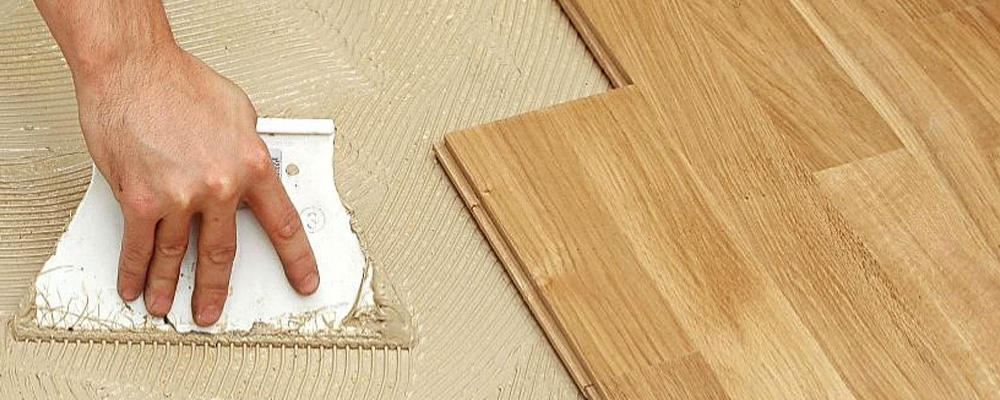
How it works: Flooring adhesive is spread on the subfloor, and planks are pressed into place.
Best for: Engineered wood over concrete or plywood, and when a quieter, solid feel is preferred.
Pros:
Strong bond, minimal movement
Excellent sound absorption
Cons:
Messier installation process
More difficult to repair or replace boards
Requires clean, level subfloor and proper adhesive
3. Floating Installation

How it works: Planks are clicked or tapped together and “float” over the subfloor without nails or glue.
Best for: Engineered wood, laminate, and DIY projects; suitable for uneven subfloors with underlayment.
Pros:
Fast and beginner-friendly
Can be installed over various subfloors, including existing floors
Easy to replace or repair individual boards
Cons:
Slightly less solid feel underfoot
Needs expansion gaps to avoid buckling
Quick Comparison Table:
| Feature | Nail-Down | Glue-Down | Floating |
|---|---|---|---|
| Best for | Solid hardwood, plywood | Engineered over concrete | Engineered, laminate |
| Tools needed | Nailer, compressor | Trowel, adhesive | Tapping block, spacers |
| Difficulty | Advanced | Intermediate | Easy |
| Stability | High | High | Medium |
| Repair ease | Low | Low | High |
| Underfoot feel | Very solid | Solid | Slightly softer |
What Mistakes Should You Avoid When Installing Tongue and Groove Flooring?

Acclimate the flooring before installing tongue and groove flooring
The most common mistakes when installing tongue and groove flooring include skipping acclimation, forgetting the expansion gap, forcing boards together, and ignoring alignment checks — all of which can lead to gaps, buckling, or a wavy finish. Here’s what to watch out for:
1. Skipping the Acclimation Period
Why it’s a problem: Wood changes size based on humidity. Installing without acclimating can cause boards to shrink or swell after installation.
Fix: Always let boards sit in the room for 48–72 hours before laying them.
2. Forgetting the Expansion Gap
Why it’s a problem: Without a 10–12mm expansion gap around the perimeter, the floor can buckle when it expands.
Fix: Use spacers along walls and remove them after installation.
3. Forcing Boards Together
Why it’s a problem: Hitting boards too hard can damage the tongue or groove, leading to loose joints.
Fix: Use a tapping block and rubber mallet, applying gentle, even pressure.
4. Ignoring Alignment Early On
Why it’s a problem: Even a 2mm misalignment in the first few rows can snowball, causing gaps across the whole floor.
Fix: Check your layout and straightness after every row.
5. Installing Over a Damp or Uneven Subfloor
Why it’s a problem: Moisture can cause warping, while bumps and dips create uneven wear and squeaks.
Fix: Test moisture levels and level the subfloor before starting.
6. Not Staggering the Joints Enough
Why it’s a problem: Joints that line up too closely weaken the floor’s structure and look unprofessional.
Fix: Offset seams by at least 150mm between rows.
7. Using the Wrong Installation Method for the Subfloor
Why it’s a problem: Nail-down on concrete or floating without underlayment can cause long-term damage.
Fix: Match the method (nail-down, glue-down, or floating) to your subfloor type.
Pro Tip: If you’re unsure about any step, consult a local expert like CB Timber Floors in Melbourne, who can inspect your subfloor and guide you on the right installation approach before you start.
After-Installation Care

8.1. Let the Floor Settle
If glued, avoid walking on the floor for 24 hours. If nailed or floating, light traffic is okay immediately.
8.2 Cleaning Tips
Sweep or vacuum regularly
Use a damp mop — never soak wood floors
Avoid harsh cleaners that strip finishes
8.3 Long-Term Maintenance
Place mats at entrances
Use felt pads under furniture legs
Maintain humidity levels between 35–55%
9. Troubleshooting Installation Issues
Gaps Appearing After Installation
Cause: Inadequate acclimation or low humidity
Fix: Use a floor gap fixer tool or re-install affected boards
Squeaky Floors
Cause: Loose boards or uneven subfloor
Fix: Add shims or use adhesive injection kits
Boards Not Locking Properly
Cause: Damaged tongues or grooves
Fix: Replace the board — forcing it in can cause more damage
10. Cost Considerations
Average Costs in Australia (2025 Estimates)
Materials: $50–$120 per m² for hardwood, $30–$80 for engineered wood
DIY Installation: $0 labour cost, but budget $200–$500 for tool hire
Professional Installation: $40–$60 per m² labour
What Environmental and Local Factors Should You Consider for Tongue and Groove Flooring in Melbourne?

When installing tongue and groove flooring in Melbourne, it’s important to consider the city’s variable climate, humidity levels, and seasonal changes. Melbourne is famous for its “four seasons in a day” weather pattern, which can cause temperature and moisture fluctuations — directly impacting how wood floors expand and contract.
1. Climate & Humidity
Melbourne’s indoor humidity can range between 35% and 65% depending on the season.
Wood naturally expands in humid conditions and contracts when it’s dry, so always leave a 10–12mm expansion gap around the perimeter.
Engineered tongue and groove flooring is often more stable than solid hardwood in Melbourne’s shifting climate.
2. Subfloor Considerations
Older Melbourne homes often have timber subfloors, while newer builds tend to use concrete slabs.
Timber subfloors: Nail-down installation works well.
Concrete slabs: Floating or glue-down methods are recommended, with a moisture barrier for protection.
3. Local Sourcing & Sustainability
Opt for Australian hardwoods like Blackbutt, Spotted Gum, or Tasmanian Oak to support local forestry and reduce carbon emissions from transport.
Choose FSC® or PEFC™ certified suppliers for sustainable flooring options.
4. Room-Specific Recommendations for Melbourne Homes
Living rooms & bedrooms: Solid or engineered hardwood for timeless style.
Kitchens: Moisture-resistant engineered boards with a durable finish.
Basements & ground-floor concrete: Floating engineered floors with a moisture barrier.
5. Seasonal Installation Tips for Melbourne
Summer: Higher humidity — acclimate boards for at least 72 hours.
Winter: Heating systems can lower indoor humidity — use a humidifier to prevent shrinking.
Store boards flat in the installation room before fitting for proper acclimation.
6. Work with a Melbourne Flooring Expert
If you’re looking for a professional finish, CB Timber Floors is a trusted Melbourne-based flooring installer with extensive experience in tongue and groove flooring. They understand the city’s climate challenges, work with high-quality Australian hardwoods, and can recommend the right installation method for your home — whether it’s a nail-down Blackbutt floor in Kew or a floating engineered Oak floor in St Kilda.
FAQs
Q: How do you install tongue and groove flooring?
A: Start by acclimating boards, preparing the subfloor, and planning your layout. Install the first row with grooves facing the wall, maintaining a 10–12mm expansion gap. Stagger joints, continue row by row, and cut the last row to fit. Choose nail-down, glue-down, or floating installation depending on your subfloor type.
Q. What is tongue and groove flooring?
A: Tongue and groove flooring features boards with a ridge (tongue) on one side and a slot (groove) on the other. The design allows the planks to interlock, creating a smooth, gap-free surface.
Q: Do you need underlayment for tongue and groove flooring?
A: Underlayment is essential for floating installations to provide cushioning, reduce noise, and act as a moisture barrier. For nail-down or glue-down methods, it may not be required, depending on the subfloor.
Q: How much expansion gap should I leave when installing tongue and groove flooring?
A: Leave a 10–12mm gap around the perimeter of the room to allow the flooring to expand and contract naturally with temperature and humidity changes.
Q: Can tongue and groove flooring be installed over concrete?
A: Yes, but it’s best to use engineered wood for concrete subfloors. You’ll also need a moisture barrier and may need to use the glue-down method instead of nailing.
Q: How long should tongue and groove flooring acclimate before installation?
A: Let the planks acclimate for at least 48–72 hours in the installation room to prevent warping and gaps after installation.
Q: . Which installation method is best for tongue and groove flooring?
A: It depends on your subfloor and preference:
Nail-down – Best for solid hardwood over plywood.
Glue-down – Ideal for engineered wood over concrete.
Floating – Great for DIYers and uneven subfloors.
Q: How much does it cost to install tongue and groove flooring in Australia?
A: In 2025, materials cost between $30–$120 per m², depending on the type of wood. Professional installation averages $40–$60 per m², while DIY saves labour costs but requires tool hire.


